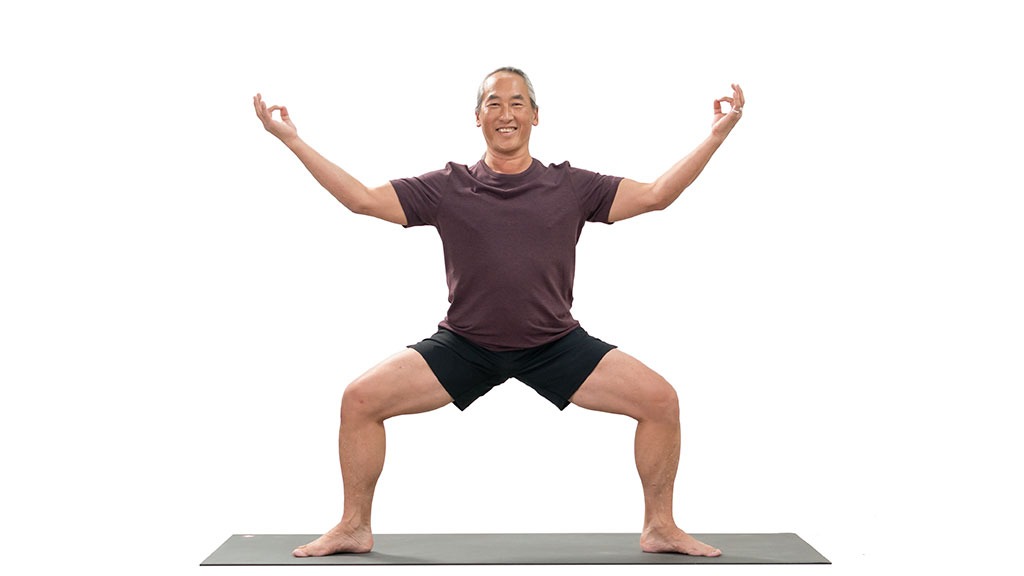
The Temple Pose, also known as Utkata Konasana or Goddess Pose variation, is a grounding and empowering yoga posture. Rooted in ancient traditions, this pose emphasizes strength, flexibility, and balance. It symbolizes stability and inner power, making it a favorite in yoga practices focused on mindfulness and body awareness.
In this comprehensive guide, we’ll explore the Temple Pose in detail, including its benefits, step-by-step instructions, common mistakes, and variations.
What is Temple Pose?
The Temple Pose is a wide-legged squat position with arms raised and bent in a symmetrical, temple-like shape. This pose is commonly practiced in Hatha and Yin Yoga and serves as a powerful posture for building strength and grounding energy. Its name reflects its symbolic connection to stability and resilience.
Benefits of the Temple Pose
1. Builds Lower Body Strength
The wide-legged squat engages the thighs, hips, glutes, and calves, making it an excellent pose for toning and strengthening the lower body.
2. Enhances Hip Flexibility
The deep bend in the hips opens and stretches the hip flexors, groin, and inner thighs, improving flexibility and range of motion.
3. Promotes Balance and Stability
The grounded stance in Temple Pose challenges your ability to stay steady, enhancing balance and coordination.
4. Cultivates Mindfulness
By focusing on alignment and breath, this pose encourages mindfulness and a sense of calm.
5. Strengthens the Core
Maintaining an upright torso requires core engagement, which helps build abdominal strength.
How to Perform the Temple Pose
Step-by-Step Instructions
- Begin in a Standing Position
- Stand tall in Mountain Pose (Tadasana) with your feet together and arms relaxed at your sides.
- Step Your Feet Wide Apart
- Create a wide stance, with your feet approximately 3-4 feet apart.
- Turn your toes slightly outward at a 45-degree angle.
- Bend Your Knees
- Lower your hips into a squat position, aligning your knees directly over your toes.
- Aim to bring your thighs parallel to the ground.
- Raise Your Arms
- Extend your arms out to the sides at shoulder height, then bend your elbows at a 90-degree angle, forming a goalpost shape.
- Keep your palms facing forward and fingers spread wide.
- Engage Your Core
- Draw your belly button toward your spine and lengthen your tailbone downward to maintain an upright torso.
- Hold the Pose
- Stay in the pose for 5-10 breaths, focusing on your alignment and steady breathing.
- Release the Pose
- Straighten your legs and bring your feet back together, returning to Mountain Pose.
Common Mistakes in Temple Pose
1. Knees Collapsing Inward
Ensure your knees align with your toes to avoid strain and maintain proper alignment.
2. Arching the Lower Back
Engage your core and tuck your tailbone slightly to prevent overarching in the lumbar spine.
3. Shoulders Tensed Upward
Relax your shoulders away from your ears to maintain a sense of openness in the upper body.
4. Uneven Weight Distribution
Keep your weight evenly distributed between both feet to maintain balance and stability.
Tips for Refining Your Temple Pose
- Warm Up Your Hips: Prepare your body with hip-opening poses like Butterfly Pose or Low Lunge before practicing Temple Pose.
- Adjust Your Stance: Modify the width of your stance to suit your comfort level and flexibility.
- Focus on Your Breath: Use deep, steady breaths to stay grounded and calm in the pose.
- Engage Your Inner Thighs: Press your thighs outward to activate the inner thigh muscles and maintain proper alignment.
Variations of the Temple Pose
1. Temple Pose with Prayer Hands
Bring your hands together at your heart in a prayer position (Anjali Mudra) to enhance focus and mindfulness.
2. Dynamic Temple Pose
Add movement by alternating between a low squat and straight legs, creating a flowing sequence.
3. Temple Twist
From the Temple Pose, place one hand on the ground and twist your torso, extending the opposite arm upward for a gentle spinal twist.
4. Supported Temple Pose
Use a wall or yoga block for additional support if balancing is challenging. Whether practiced as a standalone pose or as part of a sequence, the Temple Pose is a cornerstone for grounding and empowerment.
Incorporating Temple Pose into Your Yoga Practice
1. Warm-Up Sequence
Begin with poses like Cat-Cow, Downward Dog, and Warrior II to prepare your body for the squat and hip-opening aspects of Temple Pose.
2. Strength-Building Flow
Combine Temple Pose with other standing poses such as Warrior II, Chair Pose, and Wide-Legged Forward Fold to create a dynamic, strength-focused flow. Whether practiced as a standalone pose or as part of a sequence, the Temple Pose is a cornerstone for grounding and empowerment.
3. Cool-Down Poses
Relax with Child’s Pose, Seated Forward Bend, or Reclining Butterfly Pose to release tension in the hips and legs.
Conclusion
The Temple Pose is a powerful posture that combines strength, stability, and mindfulness. By incorporating this pose into your yoga practice, you can enhance your lower body strength, improve flexibility, and cultivate a deeper sense of inner peace. Whether practiced as a standalone pose or as part of a sequence, the Temple Pose is a cornerstone for grounding and empowerment.
